Greetings crafty friends. Today I am here with one more post for the Coffee Lovers Blog Hop. #2017SpringCLH. I have had so much fun this week with this hop and making all these projects.
Today's project was made with a stacking teacup die set, paper from a Lily of the Valley paper pad from 2014, and a sentiment from Viva Las Vegas Stamps that came in a grab bag purchase in 2014. The tea cups I colored using Recollections Watercolor Markers.
Greetings friends, today I am here with a cute little card made with a page from the Mulberry Paper Pack, a Sentiment from Mulberry Quotes and an image colored with Powderpuff Chalks.
I have to say, I was sitting looking at the paper as these are not colors I would normally use, and thought what can I do. Well, I had been working on other projects all week, and I had this coffee mug stamped/cut already and said hey, why not.
SO, first I figured I wanted to use the "Enjoy the little things in life" sentiment from MB600 and went about figuring out which pattern paper I liked the best, and MB102 won that battle quite quickly.
I then took out my PowderPuff Chalking Inks and matched up the colors the way I wanted them using Violet for the cup, Latte for the heart and Royal Blue for the lid and inside of the 'o' on the cup. This I felt helped bring all the colors in the pattern paper.
Once I had everything cut to size and together, I found a card base in my stash that is gold on the edges which I think was just the final touch this needed.
I hope you have enjoyed my project today. I think I am going to go have a cup of coffee and work on my projects for April. Have a great week. #SPRING2017CLH entry 975
Quick Quotes Items Used:
Mulberry MB102
Mulberry Sentiment MB600 coming soon
PowderPuff Violet
PowderPuff Royal Blue
PowderPuff Latte
Greetings crafty friends, here is my next entry for the Spring Coffee Lovers Blog Hop. I was at Joann's one day and just happened to see a wood block stamp and new I had to have it. I knew the hop was coming soon as this would be perfect. I then went back to the house and ordered the Gerda Steiner Designs Coffee Hedgehog to team up with it from Kat Scrappiness.
The sentiment is stamped on a die cut from Cottage Cutz called Oval Doily and Frame
Hope you have enjoyed this project today. @Spring2017clh
Anyone that knows me, can say for sure my favorite drink is tea. I prefer iced tea, but on cold nights (doesn't happen often in Florida) a cup of hot tea will work. SO, When I saw this stamp set from Darcie's called Coffee, Donuts, Friends I had to get it. SO, using my favorite colors this became my newest bookmark for my collection.
Hi there crafty friends. Today I am using a couple of digital images from Sunsational Stamps, *grand opening hop on April 5. I wanted to have some fun and bring more spring to the #2017SpringCLH ENTRY 778 with this project, so I thought the bunny making an appearance with the cute little cup in the basket would be a good way to let that happen. At the last minute, I decided to use a thought bubble and Happy Easter sentiment from Joy Clair and add a few butterfly Dew Drops. A strip of washi tape as grass and my scene is finished.
Products Used:
Digital Images from Sunsational Stamps (grand opening April 5)
Joy Clair Speech Bubbles and Happy Easter
I used the following Spectrum Noir Markers for this project:
Basket:: GB1, TN5, EB3
Eggs: OR1, CT1, BP1, BT7
Grass: JG2
Cup: LY3, DG1, FS2, FS4, BT1
Bunny:
IG2, IG3, IG5, FS6, BT7
DewDrop Butterflies
My card is a normal A2 size, I printed the image, and used an oval die with my big shot to cut him out. I then used my big shot with a tag die to cut the background pattern paper. I used Powderpuff chalk inks for the sky and ground, and Spectrum Noir Markers for the chick.
I hope you have enjoyed my project and it has bring some Springtime crafting inspiration to you.
Hi there crafty friends. Today I wanted to bring you my third entry for the Coffee Lovers Blog Hop. #spring2017clh Entry 574
I used Super Sponsor Joy Clair Stamps Coffee Lovers themed stamp set to make this shaker card.
Using 3 different inks GinaK Dark Chocolate, GinaK HoneyMustard and PowderPuff Latte I stamped the three small coffee cups. I also stamped the word Coffee in the Honey Mustard. Using sequins from Kat Scrappiness in Caramel Latte, Espresso, Australian Gold and Spring mixes I filled my windows.
I Used Couture Creations 3D foam Shaker Card Adhesive Strips to adhere the die cutout to the background page, and Kaisercraft double-sided tape to adhere acetate to the die cut.
My Chevron Layer is made using a K&Company Paperpad from 2015.
I hope you have enjoyed my card. I will be back later today with another.
Greetings friends and fellow Crafters, today I am entering this cute little card for the Spring Coffee Lover's Blog Hop. I had much fun with this card, as it is the first one I have posted on my blog for a new design team I am on. Sunsational Stamps will be having their Grand Opening hop on April 5, and this great team has been working hard getting our projects together. Please be sure go visit the fan page here on April 5 to learn more/ I hope you enjoy my card. I'll be back tomorrow with another project I have made.
Digi Stamp: We Are A Perfect Pair
Sprinkle Paper: Doodlebug Cream & Sugar Pack
Pink/Lavender Layers: Paper Studio
White Layer and Images: Recollections 110lb
Spectrum Noir:
Heart: PP1
Donut/Nose: TN2,FS1
Frosting: BP1
Sprinkles on Donut:FL1, FL2, FL3, BT5, LG1
Cup Lid: CR3, PL2
Cup PL1, LV1
Tongue: DR1
Eyes: TB3
Caramel Latte Sequins: Kat Scrappiness
Clear irRESISTible Pico Embellisher to highlight sentiment, eyes, nose, mouth, and sprinkles.
Hi there crafty friends, today I am joining in on the Spring Coffee Lovers Blog Hop. Joy Clair is proud to be a Super Sponsor again this hop.
I decided to take a different approach to my project today by using the Coffee Set as a Bible Journaling set. The verse I highlighted is Colossians 2:16 "Therefore let no one pass judgment on you in questions of food and drink, or with regard to a festival or a new moon or a Sabbath." Drink your coffee, tea, cocoa ladies and gentleman, I will not judge you.
Items used: Coffee Lovers Stamp Set
Dark Chocolate Dye Ink
Mocha Mama PowderPuff Ink
Cherry Blossom PowderPuff Ink
Yellow-Green Wink of Stella
Greetings friends and fellow crafters, LeeAnn and Quick Quotes here bringing you the March 2017 video and tutorial using the sheets from the Quick Quotes Windsong, Winter Bliss, and Anchors Aweigh paper packs along with seven of the Powderpuff Chalking inks.
The first thing I did was to cut the images I wanted using my scan n cut. I used Jade to ink up the WS105 pieces to simulate grass, some I did on the front side, others I did on the back side and alternated them. I put power tape on the back to adhere the pieces to each other. I then placed the fence pieces where I wanted them to be, and overlapped them so that they would fit properly on my layout, and found I needed another layer of grass. I then worked on placing the eggs where I would want them to be, They were cut out of the WinterBliss WI101 and 102 pages, which I then alternated them using back and front as well.
The Little bunny and the sentiment are from Sunsational Stamps and Crafts. I Chalked the edges of the sentiment using Sky Blue.
The flowers I used Fuchsia and Buttercup. The butterflies I used Buttercup, Warm Grey, Hydrangea, and Violet.
While placing everything for the layout I managed to lose a flower, but you will see in my final photo that I did find that flower, and also decided to add eyes to the bunny, along with glitter dots to the flowers and butterfly Antennae. I also decided to add an insert of AW100 to the inside of the photo frame for a little more color.
Once I have a picture of my grandchildren with the Easter Bunny this year, this page will be complete.
I hope you have enjoyed my project, please give me a thumbs up and subscribe so you will get notification of when I have another video go live. Thank you so much, and let's get crafting.
Other Products used:
Spectrum Noir Markers
Glitter Dots
Sunstational Digital Bunny Stamp & Sentiment
Please be sure to follow the Quick Quotes Blog and to check out this months challenge here, my shape is Circles, can you tell? We hope you visit again soon!
Greetings crafty friends. Today I am here with a couple of fun projects I made highlighting projects from DCAM.
First I used stencils and various Shimmer Sprays to complete the full 12x12 background.
I then stamped and colored my images with Spectrum Noir Markers, used the border die to cut out this 12x12 pattern paper to be a dance floor, I cut half, then turned the die around, lined it up and cut the other side. I cut a couple of circles with the inverted circles, one out of pattern paper and one from white. Stamped the sentiment on the white using the Stampoholic and then using the yellow ink pad I swiped it to be like the sun.
Project 2
This next project I used the envelope die cut
I first spritzed the paper with water, then sprinkled on the Color Burst Powders, as soon as it hit the water the colors went crazy. I added a few more spritz's of water and really loved the results.
I used the Celebrate die to cut from the extra front panel, I then did the same spritzing with the color bursts. Once it was dry I affixed the Celebrate die back in and adhered it to the front of the envelope.
Using the stamped images I colored with my markers then affixed them to the back of the envelope. My grandson will find this in his Easter Basket next month.
Greetings Crafty friends. LeeAnn here with a project I completed for Joy Clair's "My Redeemer CLEAR* Stamp Set Blog Hop". I stepped a little out of my comfort zone on this and had fun doing so.
The first thing I did was figure out what I wanted to do, as our challenge for this was "anything but a card/tag/bookmark" using the My Redeemer CLEAR* stamp set.
Once I got that part into my brain, I started looking around the Abyss (my craft room). I had this plaque that I had purchased back in 2014 and then put it away, it was time to put it to use.
How I made the project:
1. I used white spray paint to prime the plaque and let it dry.
2. once dry I stamped the CLEAR* images of the Tomb, the Center Cross and the sentiment using Gray Staz-On ink. I used Black Staz-On ink for the sentiment. I masked off the cross, and carefully inked up the two side crosses from the "John 3:16" stamp set.
3. Using Antique Linen Powderpuff Ink I and a duster brush I colored the ground, and using Sky Blue Powderpuff Ink I dusted the sky. I used Warm Sand Powderpuff ink to color in the crosses.
4. I used Unicorn White Hero Arts ink to stamp the Dove.
I hope you enjoyed my project today. And would like to think I have inspired you to make a project of your own. Please feel free to click and follow my blog so you get updates of my posts.
Prize Alert!!!
We have an awesome giveaway! Enter for a chance to win 1 gift card with a $25 dollar value from the Joy Clair Store! You have until March 19th at midnight (ET)to enter. The winner will be announced on Joy Clair on March 31.
This is the fun part. each of the designers has been given a special *keyword* they have used in their post. While doing this hop be sure to find each person's *keyword*, and put them together to create a sentence. Once you have the sentence please e-mail that sentence to me at kraft4fun@gmail.com with JOY CLAIR SENTENCE as the subject.
Hop with us. Be sure to visit each of the designers on this blog hop!
Items used:
JC All Things Possible Stamp Set
Gina K Honey Mustard Dye Ink
Postage Die Set
Colorbok Pattern Paper
Kraft card stock
Recollections card base
My card base is an a2 4.25 x 5.5. I had a pattern paper pad by Colorbok that has been in my stash waiting for this project. I used the largest in my postage die set to not only cut the kraft cardstock frame to 4x5.25
I had a pattern paper pad by Colorbok that has been in my stash waiting for this project. I used the largest in my postage die set to not only cut the kraft cardstock frame to 4x5.25
I used the largest in my postage die set to not only cut the kraft cardstock frame to 4x5.25 but also used the same die to cut the pattern paper to fit the inside of the frame.
Putting the pattern paper in my stamping tool, I positioned the footprints where I wanted them to appear on the paper and stamped them in Honey Mustard colored dye ink. I was able to make a second impression in the exact same place because of the stamping tool.
After I attached the inset with foam tape to give it some dimension, my project was complete.
Thank you so much for visiting the blog today. I hope I have given you some good inspiration using this great stamp set. Please remember... All Things Possible
I really hope you have enjoyed this project. Please follow my blog come back and visit again real soon.
Greetings friends and fellow crafters. Today I am on the Joy Clair blog with a couple of fun projects using this Easter Egg collection. To see how I made these projects please visit here.
I had a great time with my project last year with this set, and this year I had even more.
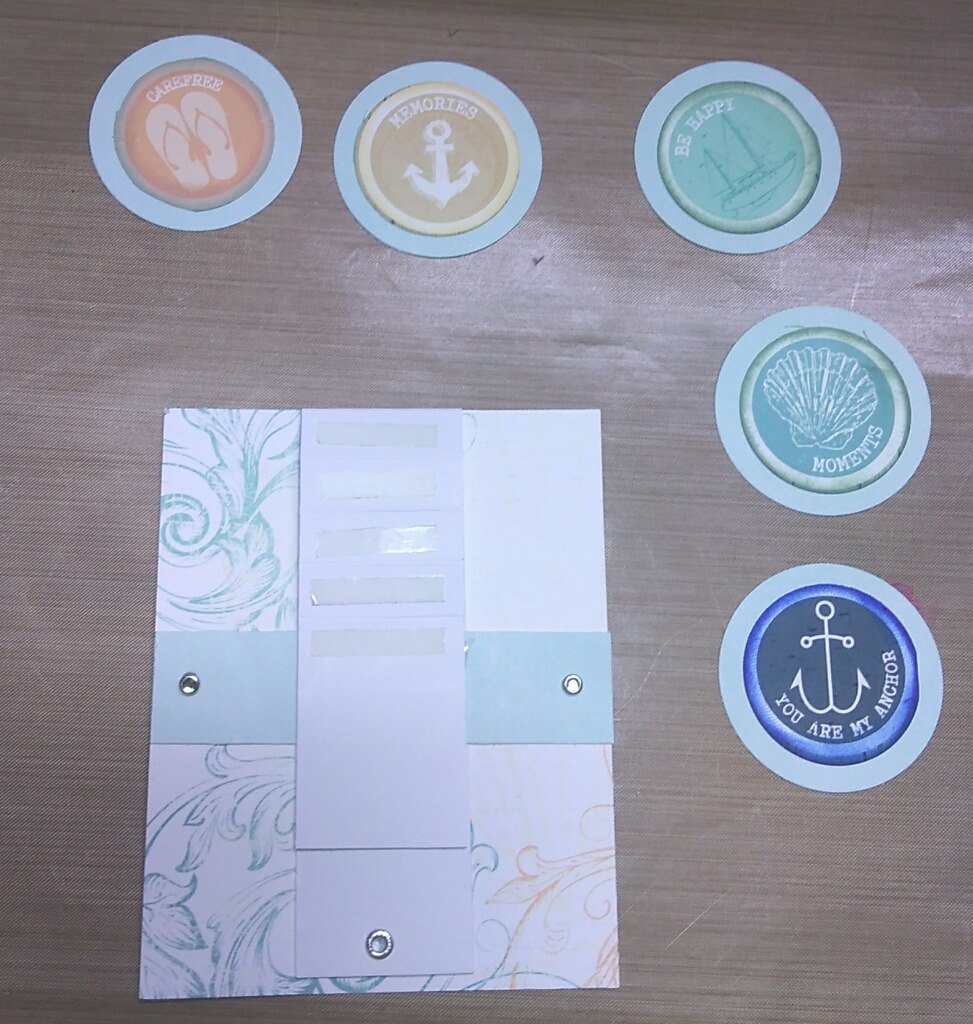
Greetings friends and fellow crafters. I'm not so sure about where you are, but here in Florida, the weather has become absolutely perfect for outdoor fun. Pretty good timing as well as hopefully by the end of next week my husband's boat will be ready to go in the water. With this in mind, I thought a card for him when it is ready to go would be in order.
I had fun with this one as I have not made this card type in quite a long while. I used to experiment every week by trying a new card fold. In an attempt to get back to that practice, I made my one that my husband loves, a Waterfall Card.
Directions to make the card will follow the photos.
For those who have not seen a Waterfall Card in action, I did a short video of it in use.
1. Items needed for project:
blank card base 4.25" x 11" folded as a top folding base.
2" x 9" cardstock
5 2" circles cut from AW100
5 1.5" sentiment circles cut from AW500
1 4" x 5.25" pattern paper AW100
1 4" x 1" pattern paper AW100
1 eyelet
2 brads
adhesive
5 PowderPuff Chalking Inks
Scoreboard
2. Take the 2" x 9" card stock and lay horizontally on scoreboard, score at 2", 2.5", 3", 3.5" and 4" fold along each line
3. Use brads to adhere the 4" x 1" strip to the 4" x 5.25 base topper in the center.
4. Add an eyelet to the bottom of the longest section of the strip with the folds. Add ribbon if so desired to this end.
5. With the eyelet end closest to the card base topper slide it under the 4" x 1" strip, with the folds above the strip and the longer straight piece below.
6. Use adhesive to adhere the top of the 2" x 9" strip to the center of the 4" x 1" strip just below the bottom score line when folded over.
7. Using coordinating PowderPuff Inks, chalk up the edges of the 1.5" sentiment circles. Adhere these circles to the center of the 2" circles cut earlier.
8. Add a strip of adhesive tape to each of the scored section, and then add one 2" sentiment circle to each tape starting with the bottom.
9. Chalk the edges of the front of the main card base, and use adhesive to attach the card topper.
10. Pull from the eyelet end, and the segments will each reveal the sentiment circle as you pull.
Non Quick Quotes Items Used:
110 lb card stock for base and 2" x 9" strip
1 eyelet
2 brads
Sizzix circle dies 1.5" and 2"
Sizzix Big Shot
Double Side Craft Tape
I hope you have enjoyed my post today, I know it has been long, however, I wanted to be sure to give a thorough tutorial. Please visit again real soon. Please be sure to follow our blog, check out this months challenge here, my shape is Circles, can you tell?
So I am sitting in the abyss and going through my email, and I see that Newton's Nook is having an Inky Paws Challenge starting today. So, why not enter. I grabbed the Wagon of Wishes set and went to work on this clean and simple card with a gift card holder attached. I will use a glue dot to hold the holder closed.
Supplies used: Newtons Nook Wagon of Wishes stamp set released August 2013
Gina K Dark Chocolate Dye Ink
Zig Clean Color Real Brush Markers
Paper Studio pattern paper
Recollections 110lb Cardstock for base
Rhinestones from my stash
This has been entered in Inky Paws #42 and Retro Rubber #57
Greetings friends and fellow crafters. I wanted to post a card today for the Joy Clair March Challenge. The theme is Anything Goes. I realize to many this looks like it should have been last month for Valentines Day, however, my husband and I will be celebrating our 5th Wedding anniversary later this month, and so I am recognizing that here today.
I started with cutting the base with my Wonky Stitches die set. I then taped off inside the stitches so they would show and spritzed with AMuse Splash Spray!!! Upon removing the tape I was able to stamp the right candy heart, the left heart and post it note were cut with the SVG file and adhered with dimensional dots.
Just a Note came from the Everyday Sentiments Set, the Post-it Note came from the Bible Planner Set and the I love everything about you came from the Hugs and Smiles set.
I really had fun making this card and hope you like it too. Please link up and join the March Challenge. More information can be found here.


